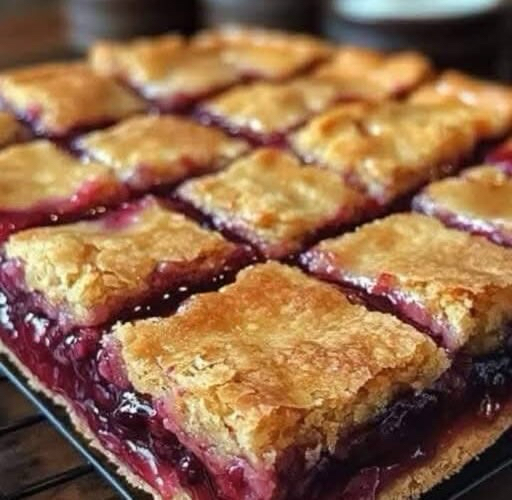
If you’re craving a classic American dessert, nothing beats a homemade cherry pie. With a flaky buttery crust and sweet, juicy cherry filling, this pie is perfect for holidays, special occasions, or just a comforting treat at home. Our step-by-step guide makes it easy to bake a pie that looks as good as it tastes.
Why You’ll Love This Cherry Pie
- Flaky buttery crust: Made with cold butter and ice water for maximum flakiness.
- Sweet and juicy cherries: Fresh or frozen cherries create a naturally flavorful filling.
- Versatile dessert: Perfect served warm with vanilla ice cream or on its own.
- Easy-to-follow recipe: Beginner-friendly with tips for the perfect crust and filling.
Ingredients for Classic Cherry Pie
For the crust (top and bottom)
- 2 ½ cups all-purpose flour
- 1 tsp salt
- 1 cup (2 sticks) cold unsalted butter, cut into small cubes
- 6–8 tbsp ice water
For the cherry filling
- 4 cups fresh or frozen pitted cherries
- 1 cup granulated sugar
- 2 tbsp cornstarch
- 1 tsp lemon juice
- 1 tsp vanilla extract (optional)
- 1/8 tsp almond extract (optional for added flavor)
Step-by-Step Instructions for Classic Cherry Pie
Step 1: Prepare the Pie Crust
In a large bowl, combine flour and salt. Cut in cold butter cubes using a pastry cutter or fork until the mixture resembles coarse crumbs. Gradually add ice water one tablespoon at a time until the dough comes together. Divide into two discs, wrap in plastic, and refrigerate for at least 1 hour.
Step 2: Prepare the Cherry Filling
In a medium saucepan, combine cherries, sugar, cornstarch, and lemon juice. Cook over medium heat, stirring frequently, until the mixture thickens and the cherries release their juices. Remove from heat and stir in vanilla and almond extract if using. Let cool slightly.
Step 3: Assemble the Pie
Preheat oven to 375°F (190°C). Roll out one dough disc to fit a 9-inch pie pan. Transfer dough to the pan and trim edges. Pour in the cherry filling. Roll out the second dough disc and cover the pie, crimp edges, and cut a few slits on top for steam to escape.
Step 4: Bake the Pie
Bake for 45–55 minutes until the crust is golden brown and the filling is bubbling. If the edges brown too quickly, cover them with foil to prevent burning.
Step 5: Cool and Serve
Allow the pie to cool for at least 2 hours before slicing. This helps the filling set for perfect slices.
Tips for Best Results
- Use cold butter and ice water for a flaky crust.
- If using frozen cherries, thaw and drain excess juice before cooking.
- Chill the dough before rolling to make it easier to handle.
- Add a small sprinkle of sugar on top before baking for a sparkling finish.
Variations of Cherry Pie
1. Lattice Cherry Pie
Create a lattice top crust for a classic look. It also allows more steam to escape and looks beautiful.
2. Cherry Almond Pie
Add slivered almonds to the filling for a nutty crunch that complements the cherries.
3. Mini Cherry Hand Pies
Use the same filling and crust to make individual hand pies. Bake 20–25 minutes at 375°F (190°C).
Serving Suggestions
- Serve warm with a scoop of vanilla ice cream or whipped cream.
- Enjoy a slice cold for a refreshing dessert.
- Garnish with a sprinkle of powdered sugar or toasted almonds.
Storage & Reheating
- Room Temperature: Store covered for up to 2 days.
- Refrigerator: Store in airtight container for up to 5 days.
- Freezing: Wrap tightly and freeze for up to 2 months. Thaw overnight in the fridge.
- Reheating: Warm slices in the oven at 350°F (175°C) for 10–15 minutes.
Frequently Asked Questions (FAQs)
Can I use canned cherries?
Yes! Drain them well and reduce sugar slightly, as canned cherries are often sweeter.
How do I prevent a soggy bottom crust?
Use a pre-baked crust (blind baking) or ensure the filling is thickened with cornstarch before baking.
Can I make this gluten-free?
Yes, use a gluten-free all-purpose flour blend for the crust. Adjust water as needed for dough consistency.
Can I prepare the pie ahead of time?
Yes, assemble the pie and refrigerate it for a few hours before baking for convenience.
Conclusion
This Classic Cherry Pie is a timeless dessert that combines a buttery, flaky crust with sweet, juicy cherries. Perfect for family gatherings, holidays, or an everyday treat, this recipe guarantees a show-stopping pie that everyone will love. With these easy instructions and tips, you can create a delicious homemade cherry pie that rivals any bakery!